Prepare VSC and GitHub
This page contains:
- Overview
- Install and set up Visual Studio code
- Create a new fork
- Clone the fork
- Create scaffolding with VSC extension
- Create a branch
- Work with markdown and YAML files
Overview
Toward the end of development, the MLS moves all the module content into a fork in GitHub. Here’s an overview of the steps. The MLS:
- Installs and sets up Virtual Studio Code (VSC) on their computer.
-
Creates a copy (a fork) in GitHub of the existing MicrosoftDocs/learn-pr repository (repo).
- The module content during development exists in this new MLS fork.
- The MLS doesn’t ever merge this MLS fork back into the MicrosoftDocs/learn-pr fork. This is done by Microsoft after development and final sign-off.
- Creates a copy (clones) the MLS fork, using VSC, to their own computer.
-
Creates the folder structure and files for all the files in the published module (called scaffolding) using a VSC extension.
- Creates the unit markdown files using the text from the module doc and a program called Typora.
-
Fills in the additional information, or metadata, to files that were created automatically when the scaffolding was created.
Tip: The Module template has notes to guide the MLS when adding metadata to the .yml files.
The rest of this page gives high-level instructions for the MLS. It walks the MLS through the process of setting up their computer and GitHub, with the end result of having scaffolding for the module and a fork, branch, and pull request.
Install and set up Visual Studio Code
Visual Studio Code (VSC) is used to work with the module files.
- The module unit files are in a code language called markdown, which is similar to HTML. Markdown files have the .md extension.
- The YAML files have the .yml extension. They are used in the published course to provide information about the course.
- Other files include images and graphics. These will have either a .png or .svg.
What the MLS should install
As the MLS, you should install:
- Visual Studio Code to edit markdown and other module files.
- Docs Authoring Pack to expand VSC with markdown-specific tools like a spell checker, markdown syntax, and the Docs Scaffolding extension.
- Word Count extension to display a word count in open markdown files.
Create a new fork
To create a fork (copy) of the MicrosoftDocs/learn-pr repo in your GitHub account:
-
In a browser, log in to GitHub and then navigate to the MicrosoftDocs/learn-pr repo.
Note: As of this writing, to access the MicrosoftDocs/learn-pr code repo, your GitHub and v- accounts need to be linked. Refer to the instructions at GitHub account setup.
-
Select the Fork button and then confirm your GitHub account as the location for the new fork.

For more detailed information, refer to Fork a repository.
Clone the fork
After you create a fork of the MicrosoftDocs/learn-pr repo, you’ll be able to access and work on your fork from your computer using VSC. You do this by creating a local copy of the fork on your computer called a clone. You make changes to the clone (on your computer) and then periodically upload the changes to the fork in GitHub.
- Make sure you are in your fork, the one you made from the MicrosoftLearn/learn-pr repo.
-
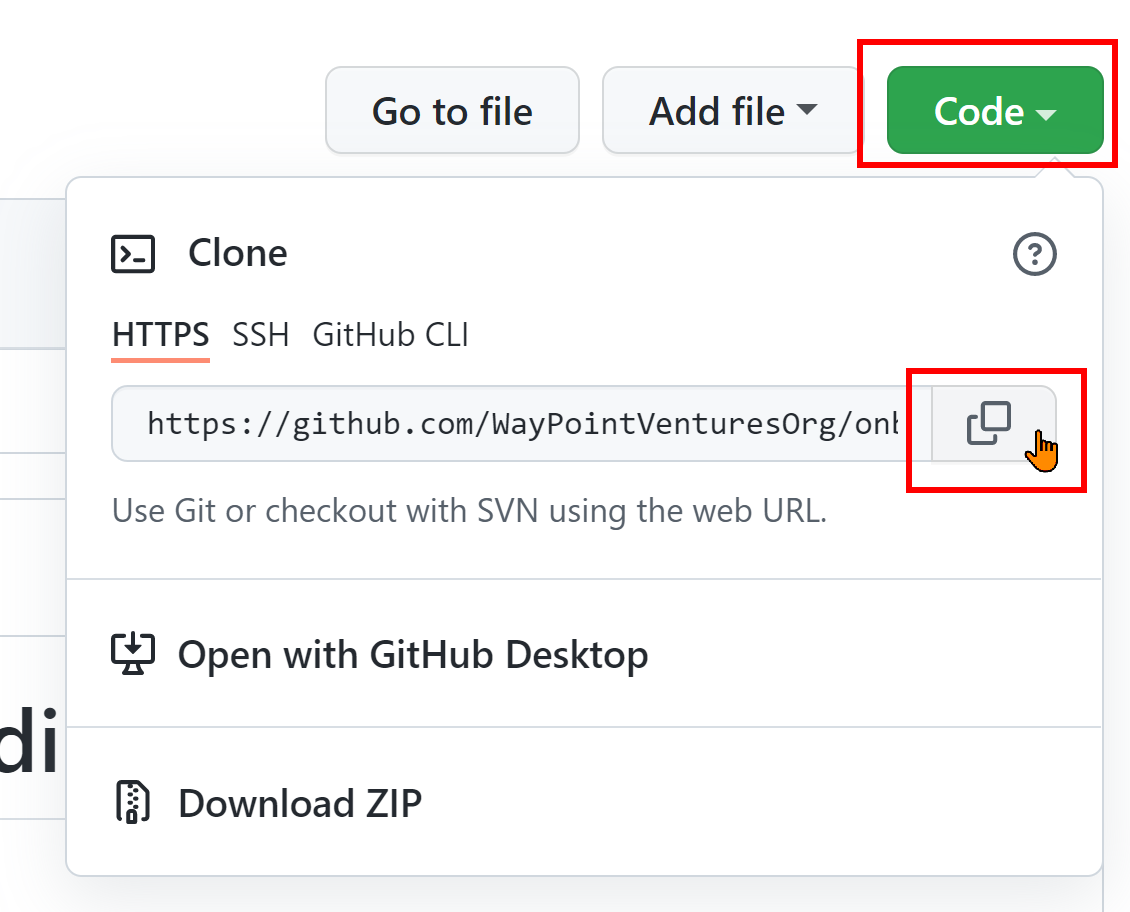
Select the Code button and then select the Copy button. This copies the address of your cloned repo into your clipboard. Note that when you clone, you are cloning from the root of your branch.

- Switch to VSC on your computer.
- Select View > Command Pallette > Git: Clone.
- Ctrl+V to paste the address of the cloned repo and then press Enter.
- Navigate to a folder on your computer and then select Select Repository Location. To avoid overly-long file paths, it’s suggested to create a folder directly on your C drive for the repo, for example, C:\repo-folder.
A copy of the module folder and all its contents is created on your computer. To work in VSC, open this local folder.
Invite collaborators
The MLS can also invite collaborators to the fork and/or branch so others on the team can also work in the fork and/or branch, if necessary. Collaborators would typically include the PjM and SME.
For more information, refer to Invite a collaborator.
Create scaffolding with VSC extension
To create scaffolding automatically, be sure the Docs Authoring Pack for VS Code extension for VSC is installed. This extension includes the Docs Scaffolding extension which the MLS uses to auto-generate (scaffold) a skeleton module based on one of the standard module patterns:
Tip: Before creating the scaffolding, update your Settings to auto-populate metadata when you create scaffolding for a new module. From the VSC File menu, select Preferences, Settings. Expand Extensions and then select Docs Scaffolding Extension Configuration. Complete instructions can be found in VSC under Extensions > docs-scaffolding > Details.

To create the scaffolding for a Standard Learn module:
- In VSC, select the Explorer button. Navigate to the parent folder, in which you want to create the module folder.
-
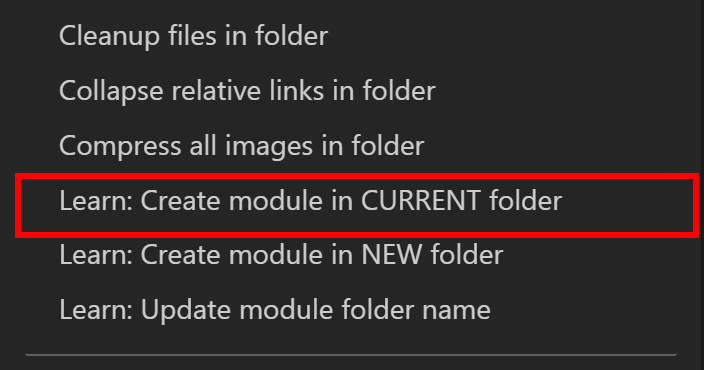
Right-click the parent folder and choose Learn: Create module in CURRENT folder.

-
Select Standard.

-
Enter the module name, all lower-case, using dashes to separate the words (not underscores), and then press Enter.

What is created in the module scaffolding
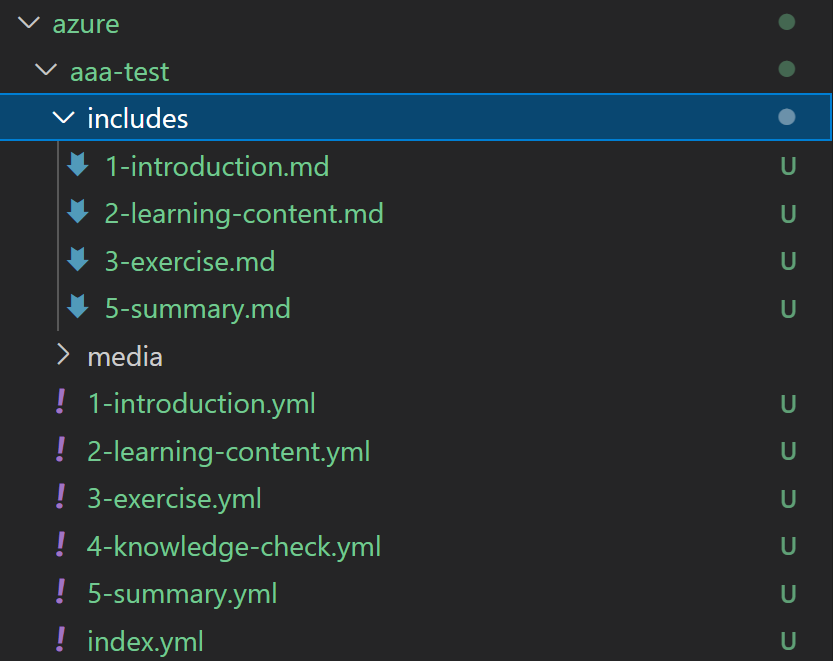
A folder is created with the module name you specified. Inside the folder are sub-folders and files.

Inside the module folder are the following:
- An includes folder used to store the unit (markdown) files. In the includes folder, there are markdown files for each unit in the module. The files contain template text help create the module content following Learn best practices. They are:
- 1-introduction.md
- 2-learning-content.md
- Make a copy of this file for each learning content unit in the module.
- 3-exercise.md
- Remove if the module doesn’t contain an exercise.
Note: Manually add a 4-knowledge-check.md file.
- Remove if the module doesn’t contain an exercise.
- 5-summary.md
- A media folder used to store the module images and media files.
- The following YAML files (with a .yml extension):
- 1-introduction.yml
- 2-learning-content.yml
- Make a copy of this file for each learning content unit in the module.
- 3-exercise.yml
- Remove if the module doesn’t contain an exercise.
- 4-knowledge-check.yml
- 5-summary.yml
- index.yml file with the default metadata updated.
For more detailed information, refer to:
Create a branch
You can make changes directly to the fork, but a method that generates a “before and after” for your changes involves a branch and pull request.
In VSC, the MLS creates a branch to use for content changes and updates. Changed content is changed in the branch, not directly in the fork.
After making changes to files in VSC, the MLS saves and uploads the changed files to GitHub. The first time this is done, VSC will prompt the MLS to create a Pull Request.
In the pull request, you can view the changes you’ve made before they are merged into the fork. After the changes are reviewed in a pull request, the changed content in the branch is merged into the fork, thereby updating the fork. At this point, typically the pull request is closed and the branch is deleted.
For more information about branches, refer to Create a new branch in VSC
Work with markdown and YAML files
Each unit in the module must have both a markdown (.md) and a YAML (.yml) file. The files should be numbered in the order they appear in the module.
The unit markdown files contain the content of the unit. The MLS adds this content from the Module Word document by using Typora.
The scaffolding YAML files contain placeholder text the MLS replaces with the real information from the Design or Module Word documents. Each YAML file also has one line that includes the file name for the associated markdown file.
Tip: The Microlearning combined template.dotx file has comments to help the MLS move the information from the template to the YAML files.
More detailed instructions for this process are in Create markdown files.
Save and upload (push) your changes
When you save your changes in VSC, the local files are updated.
To upload the changed local files to update the fork online in GitHub, you’ll need to stage, commit, and push your changes:
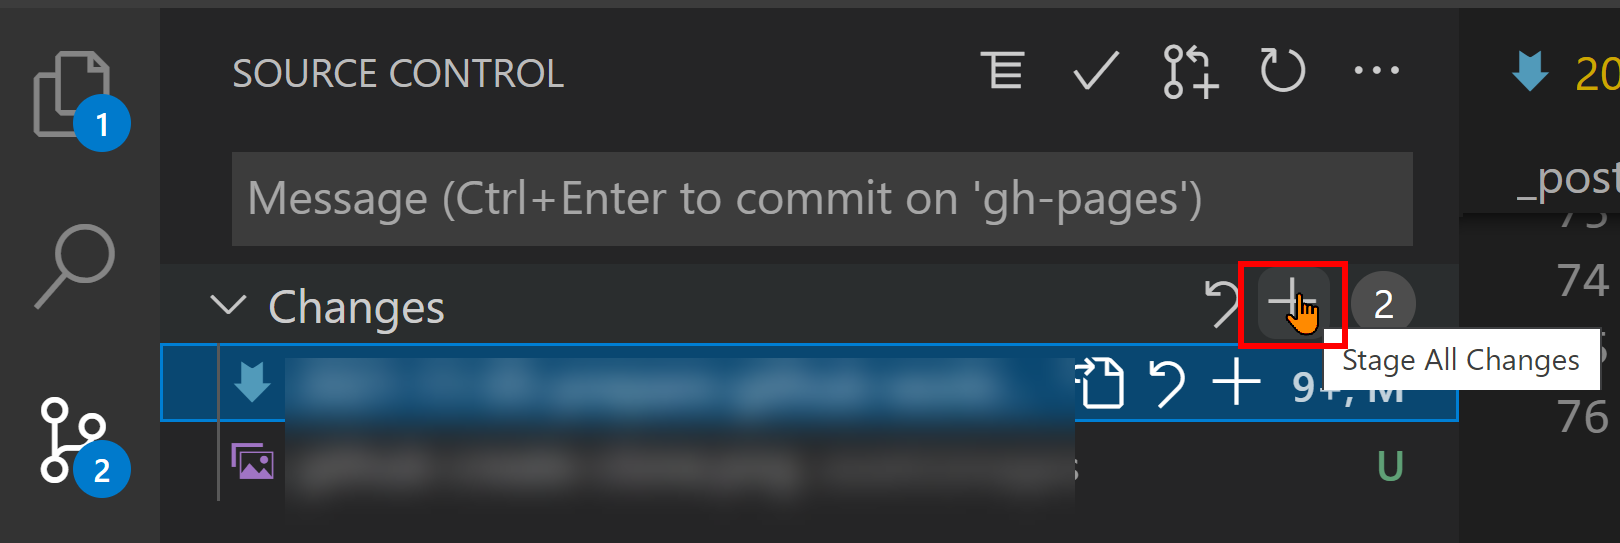
- Select the Source Control button.
- Select the Stage All Changes (+) button to stage all changed files.

- Enter a short note about the change.
-
Select the Commit button (the checkmark) to commit all staged changes.

- Select the Views and More Actions button, and then select Push.

For more detailed information about staging and pushing changes, please refer to Send (push) files: Stage, commit and push to remote repo

