Create markdown files
Toward the end of our development phase, when compliance testing needs to occur (and before a module can publish), the Microlearning Specialist (MLS) converts a module Microsoft Word document into separate markdown files (one for each unit) and moves them into the GitHub environment.
Markdown is a markup language that you can use to create web content in a simple word-processing format and then easily convert it to web content in HTML. It’s similar to HTML but much easier for most people to use, and we do, in many of our courses in the GitHub and Azure DevOps environments.
Learn more about markdown on the Markdown guidelines and examples page. Also reference the Waypoint Markdown syntax guide and related pages.
Prepare the Word document
- In the Word module document, make sure:
-
Graphics or images have appropriate alternative text.
-
The Heading 1/2/3/4/5 styles are applied. Even if the paragraphs look formatted, double-check that the styles are still in place by doing one of the following:
o Place the cursor in a heading paragraph. Examine the Style Gallery in the ribbon to ensure that a Heading style is highlighted.
o Select File > Options > Advanced. Scroll to Display. In the Style area pane width in Draft and Outline views box, enter 1, and then select OK. Select View > Outline (or View > Draft). The paragraph styles will appear on the left side of the document.

-
Switch to Print Layout. (View > Print Layout)
-
Select all the text in the Word document (Ctrl+A) and then copy it (Ctrl+C).
-
Start Typora.
-
In Typora, select the View menu. If Source Code Mode has a checkmark beside it, select it to turn Source Code Mode off.
-
Press Ctrl+V to paste the contents of your clipboard.
-
Select View > Source Code Mode.
Clean up the file in Typora
You can clean up the file in Typora, or do it in VSC. There are advantages to using VSC, however you can do some global fixing in Typora before you split the file into multiple files in VSC.
Typora: Use find/replace to fix text
-
Locate a bulleted list.
-
Select the bullet and all the spaces up to the text, and then copy the selection.
-

-
Press Ctrl+H to open the Replace box.
-
Paste the contents of the clipboard in the Find (first) box. In the Replace box, type a dash followed by one space:

-
Select Replace and confirm that the replace action worked.
-
Select Select All to replace all round bullets with markdown bullets.
-
Save the file with a .md extension to save the file as a markdown file.
Also consider replacing:
-
Two spaces with one space. You might need to do this action many times if you have tables.
-
Numbered lists with all “1s”. For example, search for 2. and replace with 1.
Work in VSC
The first step in working in Visual Studio Code (VSC) is to create the unit and yml files. Before you can do this, you’ll need to set up the scaffolding. Please refer to pPrepare the GitHub working environment] for instructions.
Create the unit and yml files
-
Start VSC.
-
If necessary, open the markdown file you created in Typora.
-
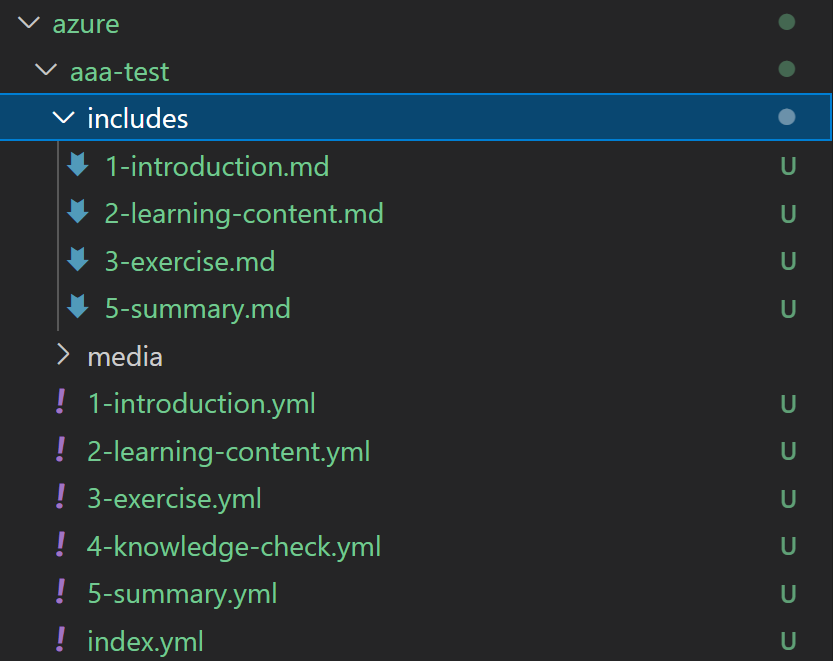
Right-click the includes folder to create files in VSC for each unit you will need. Note that some files will already be created due to the scaffolding. You can rename and use the 2-learning-content.md file for one learning-content unit, and the 3-exercise.md file for one exercise unit.
-
Create one .yml file for each unit, as needed.
-
Copy and paste the content of the 2-learning-content.yml file to each additional learning content .yml file, and do the same with 3-exercise.md for exercise units.
-
Copy (or cut) the content for each unit from the Typora file and paste it into the markdown files you’ve created.
-
Cut the name of the unit from the unit.
-
Select the .yml file for the unit and then paste the name of the unit after “title:”.

File names
Here’s an example of a correct file name: 3-use-azure-resource-manager.md
Markdown, YML, and image file names should:
- Start with the unit number.
- Use all lowercase letters.
- Use dashes to separate the words in the name (don’t use underscore characters).
- Not use abbreviations or unapproved acronyms in file names. For Azure technologies, don’t use “rm” or “arm” in file names.
- Be less than 80 characters. If the name is longer than 80 characters, the publishing process will fail.
- Not use small words like “to” and “a” that aren’t critical to the name’s meaning.
- Approximate the unit titles, but they don’t need to be a precise match.
- Use active verbs and not use gerunds (“ing” verbs).
VSC: Use find/replace to fix bulleted lists and two spaces
If you didn’t fix the bullets in Typora, follow these steps to fix them in VSC:
-
Locate a bulleted list.
-
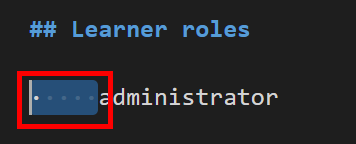
Select the bullet and all the spaces up to the text.
-
Press Ctrl+H to open the Replace box. The selected text should already be in the “find” box.
-
In the Replace box, type a dash followed by one space.
-
Select the Replace button (1) to replace the chosen text and confirm that the replace works the way you intend it to.
-
Select the Replace All button (2) to replace all the rest.

- If you perform find/replace after you’ve saved the content into separate markdown files, right-click on the includes folder and then select Find in Folder. This will give you results for all the files. It’s quicker to do this, but also a little safer, since you can preview the find results and determine if you want to replace each result.
VSC: Use find/replace to fix numbered lists
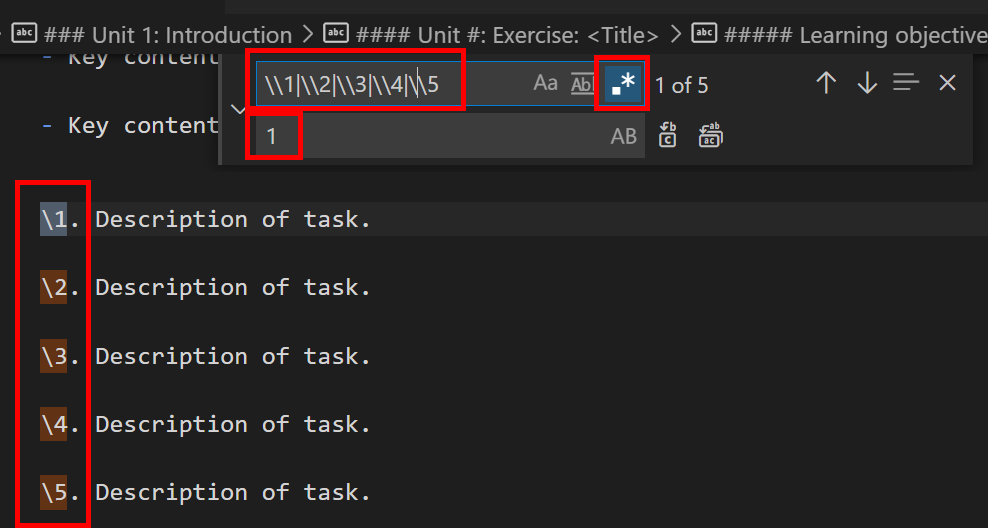
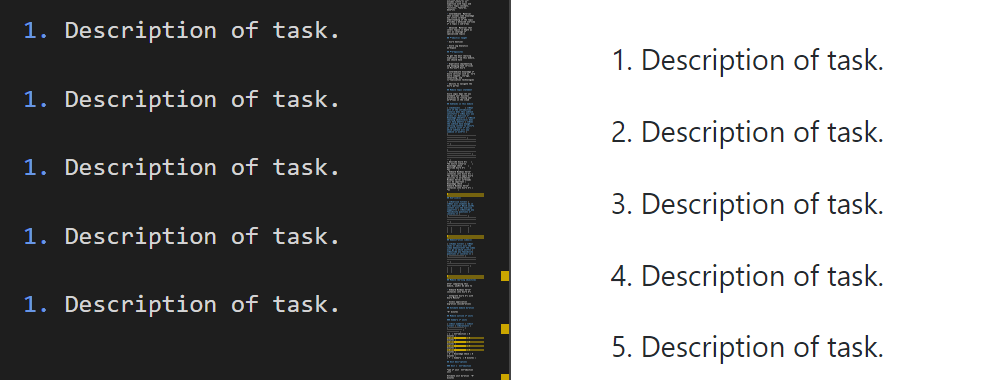
Numbered lists from Word tend to become backslash, number, period, spaces. To remove the backslash and change all the numbers to a 1 (which is better in markdown), follow these steps:
-
In VSC, press Ctrl+H to open the find/replace box.
-
In the Find box, type \1 \2 \3 \4 \5 \6 \7 \8 \9.
-
The backslash is an escape character, so you need to enter it twice to find a backslash.
-
The pipe symbol is an or condition.
-
If you have extra spaces between the period and the text, run a find/replace to find two spaces and replace with one.
Check headings
Scan the text for each unit. If there are “headings” that are just bold text, you need to find them and change them to real headings. Search for two asterisks to help locate the bold text. Then manually replace the first two asterisks with hash tags (at the beginning of the line) followed by a space. The number of hash tags you use will indicate the heading level:
-
## is heading 2
-
### is heading 3
-
#### is heading 4
… and so on, up to heading 6.
Remove the asterisks at the end of the line.
For example:
- Change **Send a response** to ## Send a response.
Use Find feature to find or find/replace in multiple files
We recommend using the find and find/replace feature inside of each unit, rather than the Search button (the magnifying glass), which finds/replaces in all units. Staying in one unit might be safer until you are comfortable working in VSC.
-
Press Ctrl-H to open the Find/Replace pane.
-
Enter your search term and then press Enter.
-
Enter the value you want to replace, if applicable.
-
Use the up/down arrow buttons to advance through the unit. The occurrence that will be replaced is highlighted in white (the other occurrences are highlighted in orange).
-
For each found result, you can select Replace or Dismiss.

Code snippets
If you have code snippets, add three tick marks before and after the code. After the first three tick marks, add the name of the language:
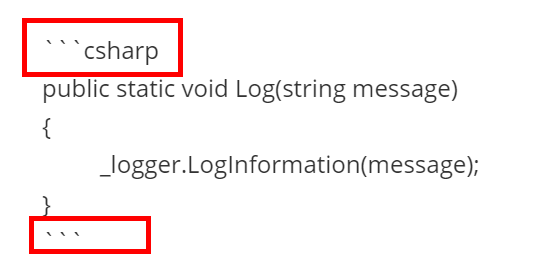
Note that you can do this in VSC also.
Graphics
If you have graphics in a unit, the code in VSC will be in the wrong format, and the file path for the image will be your computer’s local file path. For example:
)
Manually change the format and file path, adding a lightbox attribute:
:::image type="content" source="../media/2-image-name.png" alt-text="alt text goes here." lightbox="../media/2-image-name.png":::
Note: Most images benefit from a lightbox. You can use the same image file for the source and lightbox, providing the resolution on the image is sufficient and the image is large enough.
Image filenames begin with the unit number, contain no spaces or capital letters, and contain dashes, not underscores.
For more information about graphics in markdown, refer to Markdown guidelines and examples.
Alerts
If you have notes, change the Markdown to look like one of the following:
> [!NOTE]
> Information the user should notice even if skimming.
> [!TIP]
> Optional information to help a user be more successful.
> [!IMPORTANT]
> Essential information required for user success.
> [!CAUTION]
> Negative potential consequences of an action.
> [!WARNING]
> Dangerous certain consequences of an action.
Here is what the alerts look like when they are published:
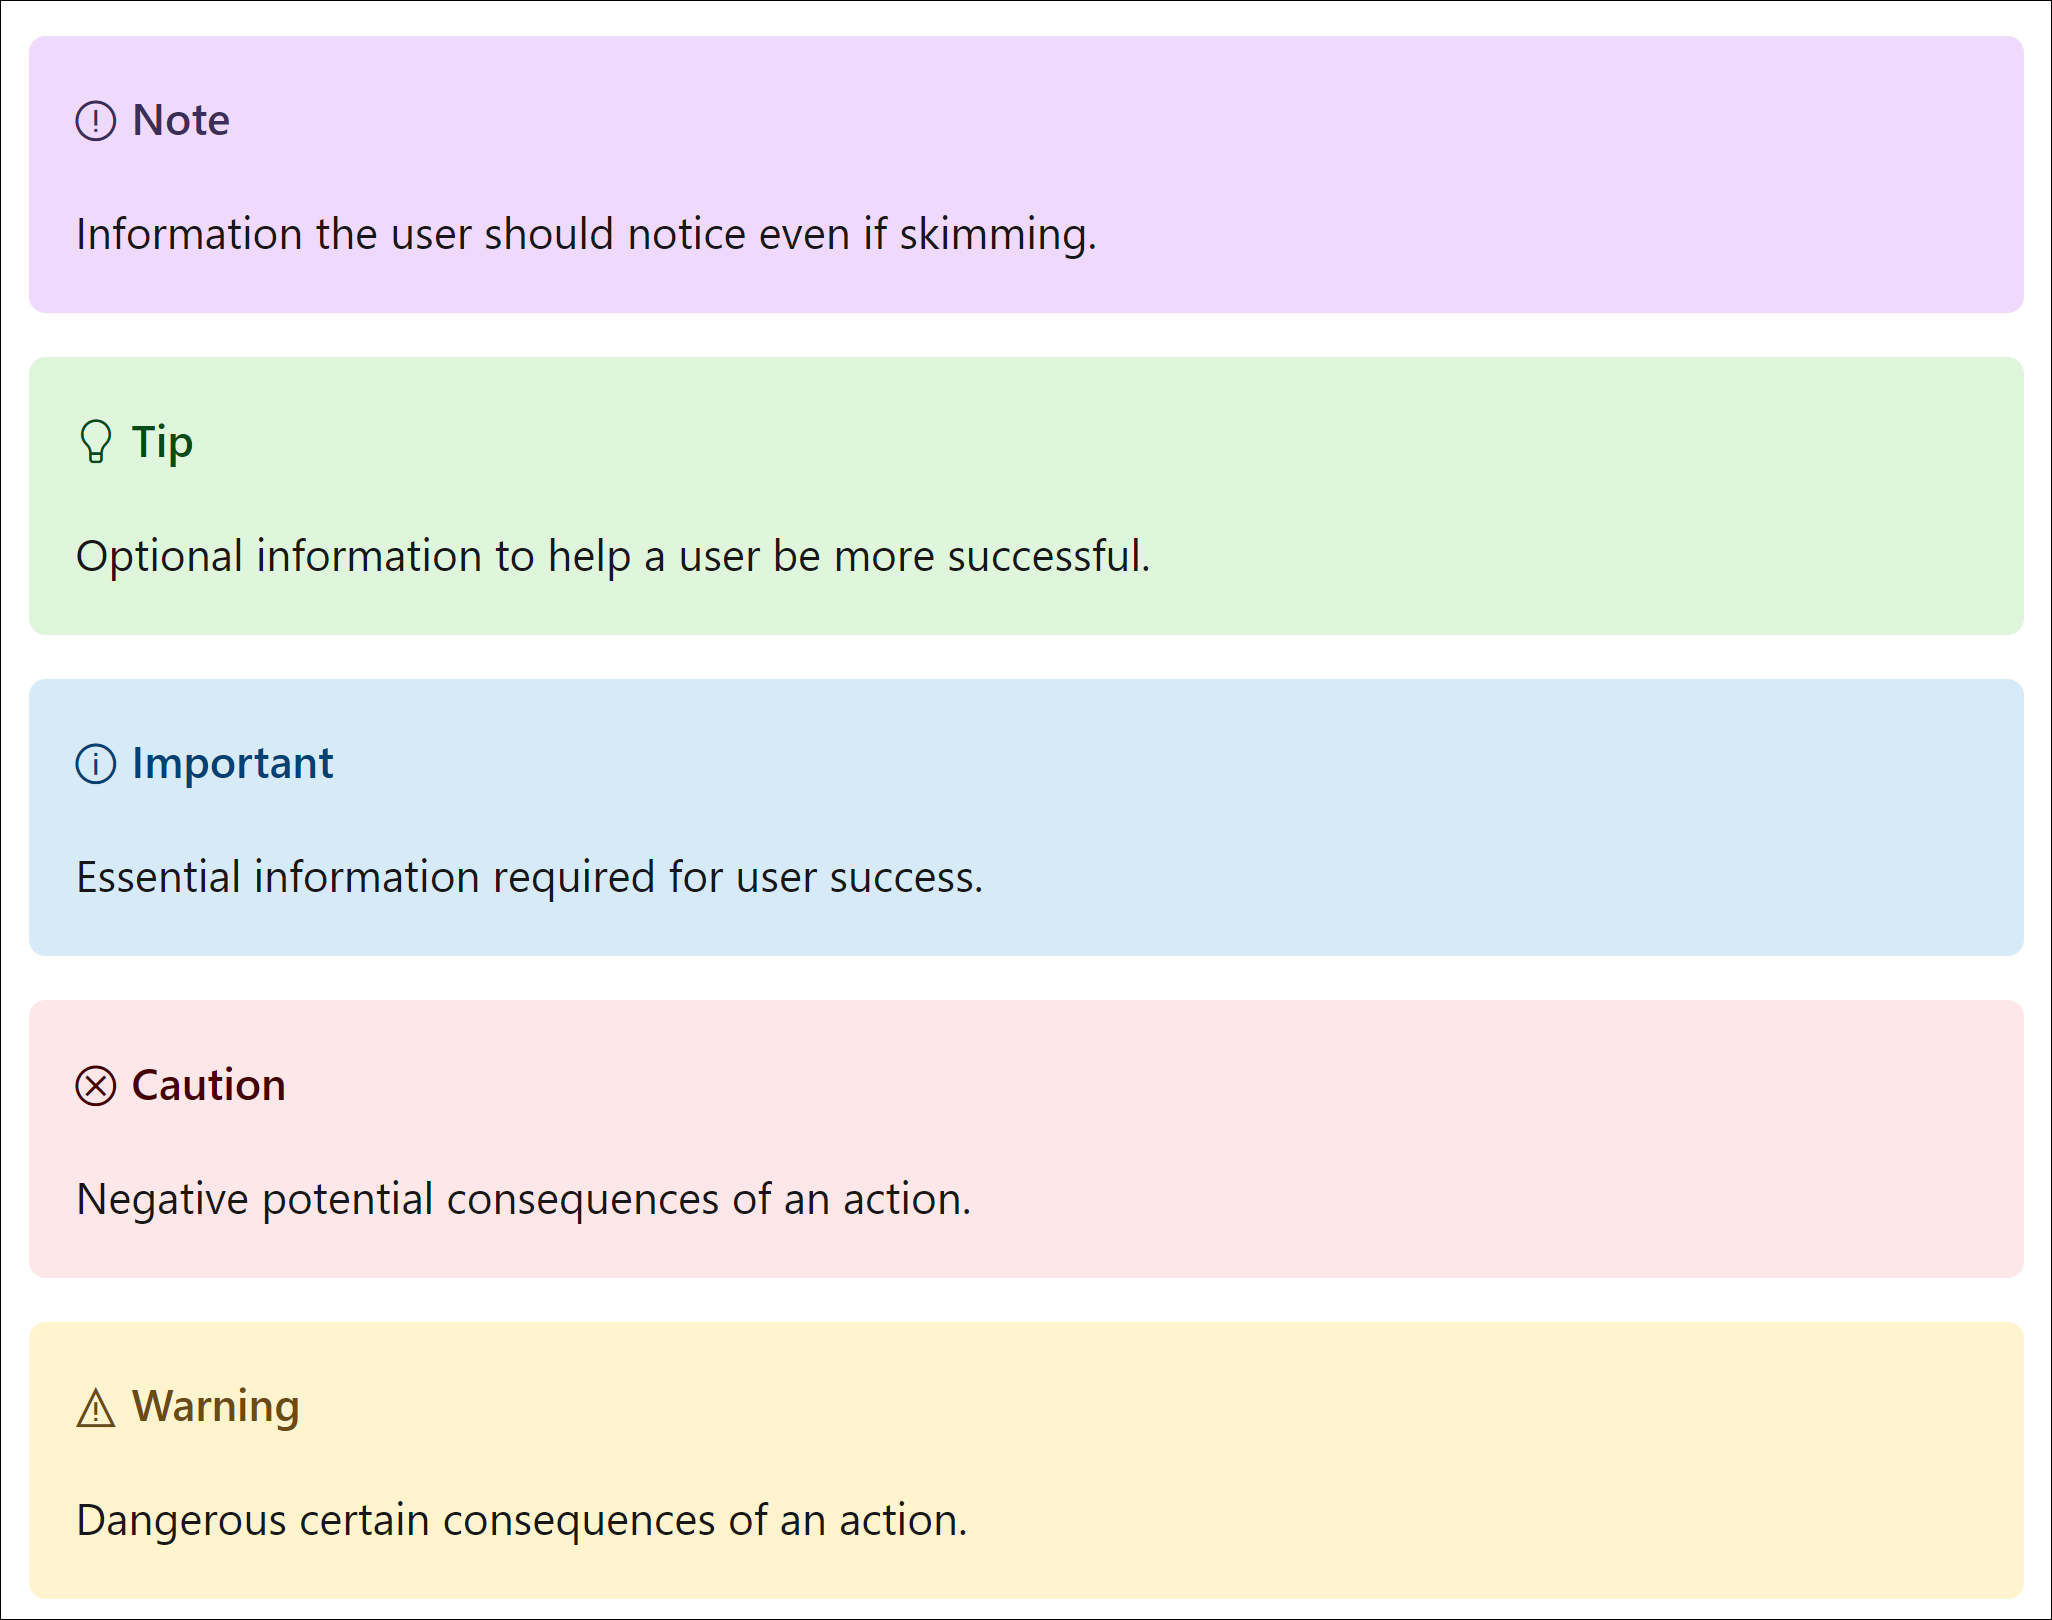
For more information about markdown, refer to [Markdown guidelines and examples].
Add metadata to the YML files
The YML files need to have metadata added to them. Whenever you see “To Do” in the yml file, that’s an indicator that the SME or MLS (or sometimes, the PjM) should add metadata.
Refer to the comments in the Microlearning combined template and supporting files for guidance about which content from the Design document and Module document needs to be copied to the YML files:
For more information about adding metadata, refer to Reference guide for reviewing pull requests (PRs) in the Learn repo
.
